
A number of years ago, after I had re-taught myself how to crochet, I decided to make my children, husband and myself Christmas stockings. We picked our favorite colors and what I produced was stocking-ish. They served us well over the years. And then ten years after my baby boy was born, we went and had another kid. And I realized a couple weeks ago that I needed to make her a stocking. And then I realized that, as I’ve come a looooooooooooong way in my abilities, Little Bit’s stocking was going to look different (and way better) than the big kids’. And they decided they wanted new stockings.
Curly, my 14 year old daughter, had outgrown her love of PINK AND ALL THINGS PIIIIINNNKKKK and for the last two or three years has grudgingly hung up that pink, white and red striped monstrosity. Boy, 10, just likes all things new.
So I searched on Ravelry for a crocheted Christmas stocking pattern that was free and all the ones I could find were worked flat and seamed up the back. No. Just no. Sooooo I worked one up myself. And I jotted down notes. And then when I crocheted the next stocking I reworked the heel and really wrote out directions.
Without further ado, or long winded stories featuring ugly giant socks that I stuff candy in, I mean, that Santa stuffs candy in, I give you–
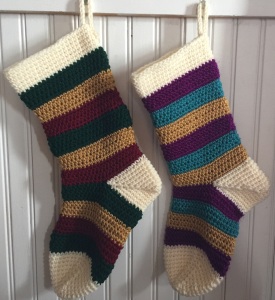 Christmas Stockings
H hook and worsted weight yarn in four colors- one for the top cuff, the heel and the toe (I chose white yarn), and three others for stripes.
Gauge- doesn’t matter cuz no one’s wearing the sucker (except my son immediately put it on his foot and walked around)
Notions- large eyed needle, 2 stitch markers
stitches used: sc- single crochet; hdc- half double crochet; slst- slip stitch; fsc- foundation single crochet; sc2tog- single crochet two together; sc3tog- single crochet three together
For Cuff: (white yarn)
1- Ch 43. Sc in 2nd ch from hook. Sc 41 to end. Join with slst to work in round.
2- Ch 1. Sc in join and to end. Join with slst. (42 sc)
3-6: Rep Row 2 four times.
–Fasten off. I use the invisible fasten off any time I work stripes in the round. This way I never get a weird color bump. (See tutorial at the end of the pattern.)
7- Join new color in the stitch directly above the beginning of the first row. Ch 1. Sc in same st. Working over tails of new yarn and old yarn, sc evenly around. (If you are unfamiliar with working over the tails, or you don’t like it, you can leave them to weave in later. I just find this expedient. See tutorial at the end of the pattern.)
8- ch 2. Hdc in same stitch and around. Join with slst.
9- Rep Row 8.
10- ch 1. Sc in same st and around. Fasten off with invisible fasten off as before or whichever way you prefer.
11-14: Rep Rows 7-10 with second stripe color.
15-18: Rep Rows 7-10 with third stripe color.
19-22: Rep Rows 7-10 with first stripe color.
23-26: Rep Rows 7-10 with second stripe color.
27-30: Rep Rows 7-10 with third stripe color.
Work should now measure approximately 9″ from beginning of cuff.
For heel turn: (white yarn)
-Lay work flat with beginning of round in the middle. Mark the far left and right stitches. There should be 20 stitches between markers. Join yarn as before.
Heel Row 1- Sc to first m. Sc in marked stitch, moving m up. Fsc 20. Skip the 20 sts between markers. Sc in second marked stitch, moving m up. Sc to end. Join with slst.
HR2- Sc to one st before m. Sc3tog (last 2 sc and first fsc), moving m to newly made st. Sc in each fsc to one st before m. Sc3tog (last fsc and first sc), moving m to newly made st. Join with slst
HR3- Sc to one st before m. Sc3tog, moving m to newly made st. Sc in each fsc to one st before m. Sc3tog, moving m to newly made st. Join with slst. (34 sc)
HR4-10: Rep HR3 until ten stitches remain. Cut yarn leaving 6″ tail. Turn heel inside out and sew seam. Weave in ends.
For foot: (white yarn)
31- With first color, join to the middle of the bottom of the heel turn. Sc 42. These stitches will be the last row of the heel turn and the last row of the leg (the skipped, unworked sts when creating the heel turn.)
32-46: Continue in established stitch and stripe pattern for approximately 5″ (this gave me 4 stripes on the foot).
For toe: (white yarn)
47- lay work flat again, and as for heel, m far left and right stitches, with 20 sts between markers. Join yarn. (decrease row) Sc to 2nd st before marker. *Sc2tog. Sc in marked st, moving m up. Sc2tog.* Sc to 2 sts before next marker. Repeat from *to*. Sc to end of row. Join with slst (38 sc)
48- Work one even row in sc.
49-50: Work a decrease row and an even row. (34sc)
51-56: Work decrease row for every row until 10 sts remain. Cut yarn with 6″ tail. Turn inside out and sew toe seam.
Weave in ends.
Loop:
Chain 21. Slst in 2nd ch from hook and across. Ch 1. Slst up opposite side. Fasten off and sew securely onto stocking with yarn tails.
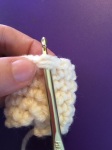
Invisible Fasten Off:
 Cut yarn, leaving at least a 3″ tail. Pull tail all the way through the last stitch on the hook.
 From back of work, insert hook under both loops of second stitch in round.

Yo, and pull through all the way again.

From the back, insert hook into the back loop only of the last stitch in the round.
 Yarn over
 And pull all the way through and to the back.
To join new color and work over tails:
 Insert hook under false stitch you just created and also under the loops of the real first stitch. This helps create a stronger join than just working into the false stitch which can be floppy and loose.
 Pull up a loop. Ch 1 and sc into the same space. Insert hook into next st and catch the tails of both the new yarn and the old like so


Continue working around, working over tails to eliminate the need for weaving in later. Make sure to work a couple of inches of the tail so that it doesn’t come loose.

Perfect stripes!
——————–
There you go! Great stockings to hang for Christmas whether or not you have a chimney.
Disclaimer: I have not had this pattern tested, so please let me know if you find any errors. Thanks!

I am gonna make these for me, my hubby, 3 adult kids and 3 fur babies!!! Great job! I love them!!!
LikeLiked by 1 person
Thanks! Let me know if you have any problems with the pattern. Good luck!!
LikeLike
I just finish making one for my son. He loves it! I’m a bit of a newbie and just have a question about the seam. On my stocking, the seam is slanted and can be seen on the front. There doesn’t seem to be a visible seam on your stockings. What may I have done wrong?
LikeLiked by 1 person
I’m so glad you were able to follow the pattern! As for the seam, I found I needed to start the color changes sometimes a few stitches before the fasten off or a few after so that the starting point stayed in the same spot. That helped keep the seam at the “back of the leg” (as though you were wearing the sock).
LikeLike
I love the stockings and will definitely be adding these to my to do list! Love your sense of humor too.
LikeLiked by 1 person
I am having serious issues with the heel. I did my own variation of stripes. I have my far left and right marked. There are 20 stitches between the markers on the side facing me. 19 stitches between markers on the side of the stocking that is face down. If I start at the beginning of my round and school to the marker and in the marker there will only be 19 stitches btwn the markers. I need help lol
LikeLike
Lay your work flat. Mark the side stitches and make sure there are 20 stitches between markers on the side facing you. Single crochet to the closest marker, moving marker up. Single crochet to the second marker, moving marker up. Foundation single crochet 20. Skip all the next stitches and anchor the foundation single crochets to the next marked stitch with a single crochet. Move the marker up and work to the end of the round.
When you go to work the foot, work into the base of the 20 foundation single crochets and however many unworked stitches you left while working the heel. There should be 42 stitches in all but if not, it’ll still be okay.
LikeLike
Are we single crocheting the fsc to the stitch before the marker, or into the marked stitch? Also, are we single crocheting between the marked stitches after we join the fsc?
LikeLike
Into the marked stitch. Then you’ll Sc around the back half of the leg of the sock’s stitches and the fsc stitches. Once you finish the heel, you’ll Sc into the bottom of the fsc and the unworked stitches from the front half of the leg which will not include the marked stitches as they’ve already been worked into.
LikeLike
I need help with the heel
LikeLike
I had a dickens of a time getting started without twisting and being able to see my stitches enough to count. I stumbled on the idea of substituting hdc for sc in the first row and it worked! Looks good, too.
Pam
LikeLike
Pingback: 15 FREE Crochet Christmas Stockings Patterns - Marly Bird™
Thank you so much for including my pattern in your post!
LikeLike
I’m having a hard time with the heel. At what point do we switch to the heel colour? Is there a video or some photos to help figure out what you are saying?
LikeLike
Switch to the heel color when you’ve finished the leg of the stocking, where the pattern says “For heel turn”. I don’t have any photos or videos to show, I apologize. Lay your work flat (which should resemble a tube at this point), with the beginning of the round in the middle. Mark two stitches, one to the left and one to the right at the edges of your tube. Join your yarn to the marked stitch on the right and work to the marked stitch on the left (or vice versa if you crochet left handed) in the manner the pattern states. I hope this clears some confusion!
LikeLike